前回に引き続き、無料のソースコード管理 (SCM: software configuration management) ソフト Git で用いられるブランチモデルのひとつである git flow の方式で、本番環境用の master ブランチにコミットする例を紹介します。
開発用の develop ブランチから分岐させた release/xxx ブランチで、master ブランチで公開したいファイル以外を除外して、master ブランチにそれをコミットしてバージョンを表すタグ付けを行います。

※Git-2.49.0 (64 bit) を使用します。
前回の記事
前回については以下の記事を参照してください。
master にマージしないファイル群を Git 管理から除外するコミット
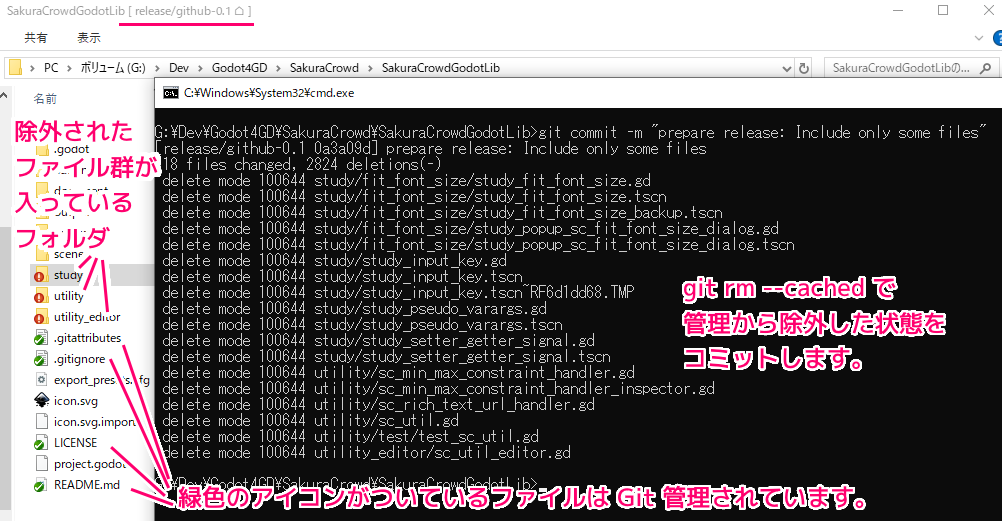
前回、git rm –cached コマンドで、master ブランチにマージしないファイル群を Git 管理から除外(削除)しました。
ファイル群を除外(削除)したワーキングツリー(作業ディレクトリ)の状態を、 release/github-0.1 ブランチに git commit コマンドでコミットします。
git commit -m "コミットに関するメッセージ"Use <msg> as the commit message. If multiple
-moptions are given, their values are concatenated as separate paragraphs.The
-moption is mutually exclusive with-c,-C, and-F.<msg> をコミットメッセージとして使用します。複数の -m オプションが指定された場合、それらの値は別の段落として連結されます。
-m オプションは、-c、-C、および -F とは相互に排他的です。
Git – git-commit Documentation と Google 翻訳
コマンドを実行すると、ワーキングツリー(作業ディレクトリ)で Git 管理から除外(削除)されたファイルの状態が、各ファイルごとにコミットされました。
G:\Dev\Godot4GD\SakuraCrowd\SakuraCrowdGodotLib>git commit -m "prepare release: Include only some files"
[release/github-0.1 214b813] prepare release: Include only some files
 18 files changed, 2824 deletions(-)
 delete mode 100644 study/fit_font_size/study_fit_font_size.gd
 delete mode 100644 study/fit_font_size/study_fit_font_size.tscn
 delete mode 100644 study/fit_font_size/study_fit_font_size_backup.tscn
 delete mode 100644 study/fit_font_size/study_popup_sc_fit_font_size_dialog.gd
 delete mode 100644 study/fit_font_size/study_popup_sc_fit_font_size_dialog.tscn
 delete mode 100644 study/study_input_key.gd
 delete mode 100644 study/study_input_key.tscn
 delete mode 100644 study/study_input_key.tscn~RF6d1dd68.TMP
 delete mode 100644 study/study_pseudo_varargs.gd
 delete mode 100644 study/study_pseudo_varargs.tscn
 delete mode 100644 study/study_setter_getter_signal.gd
 delete mode 100644 study/study_setter_getter_signal.tscn
 delete mode 100644 utility/sc_min_max_constraint_handler.gd
 delete mode 100644 utility/sc_min_max_constraint_handler_inspector.gd
 delete mode 100644 utility/sc_rich_text_url_handler.gd
 delete mode 100644 utility/sc_util.gd
 delete mode 100644 utility/test/test_sc_util.gd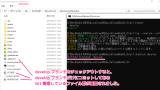
delete mode 100644 utility_editor/sc_util_editor.gd結果として、4つのファイル(下図の緑色のアイコンがついているファイル)だけが Git 管理に残りました。
コミット後 Git で管理しているファイルの確認
git ls-tree コマンドで、HEAD が指している現在のコミットで Git 管理しているファイルを確認します。
※下記のコマンドの HEAD の部分には、コミットオブジェクトを指すハッシュ値 (SHA-1) やひとつ前を表す HEAD~ なども指定できます。
git ls-tree -r --name-only HEADLists the contents of a given tree object, like what “/bin/ls -a” does in the current working directory. Note that:
- the behaviour is slightly different from that of “/bin/ls” in that the <path> denotes just a list of patterns to match, e.g. so specifying directory name (without
-r) will behave differently, and order of the arguments does not matter.- the behaviour is similar to that of “/bin/ls” in that the <path> is taken as relative to the current working directory. E.g. when you are in a directory sub that has a directory dir, you can run git ls-tree -r HEAD dir to list the contents of the tree (that is
sub/dirinHEAD). You don’t want to give a tree that is not at the root level (e.g.git ls-tree -r HEAD:sub dir) in this case, as that would result in asking forsub/sub/dirin theHEADcommit. However, the current working directory can be ignored by passing –full-tree option.現在の作業ディレクトリでの「/bin/ls -a」の動作と同様に、指定されたツリー オブジェクトの内容を一覧表示します。ご了承ください:
この動作は、 が一致するパターンのリストのみを示すという点で、「/bin/ls」の動作とは少し異なります。したがって、ディレクトリ名を指定すると (-r なしで) 動作が異なり、引数の順序は関係ありません。
この動作は、 が現在の作業ディレクトリからの相対パスとして解釈されるという点で、「/bin/ls」の動作と似ています。例えば。ディレクトリ dir を持つディレクトリ sub にいる場合は、 git ls-tree -r HEAD dir を実行してツリーの内容 (HEAD の sub/dir) を一覧表示できます。この場合、ルート レベルにないツリー (例: git ls-tree -r HEAD:sub dir) を指定しないでください。そうすると、HEAD コミットで sub/sub/dir が要求されることになります。ただし、 –full-tree オプションを渡すことで、現在の作業ディレクトリを無視できます。
Git – git-ls-tree Documentation と Google 翻訳
-r オプションで、下位フォルダの中身も再帰的に表示します。
-r
Recurse into sub-trees.
サブツリーに再帰します。
Git – git-ls-tree Documentation と Google 翻訳
–name-only オプションでファイル名のみを1行に1つずつリストで表示します。
List only filenames (instead of the “long” output), one per line. Cannot be combined with
--object-only.(「長い」出力ではなく) ファイル名のみを 1 行に 1 つずつリストします。 –object-only と組み合わせることはできません。
Git – git-ls-tree Documentation と Google 翻訳
実際に、実行すると、先ほど除外されなかった Git 管理されている4つのファイル名がリストに表示されました。
G:\Dev\Godot4GD\SakuraCrowd\SakuraCrowdGodotLib>git ls-tree -r --name-only HEAD
.gitattributes
.gitignore
LICENSE
README.md
TortoiseGit での確認
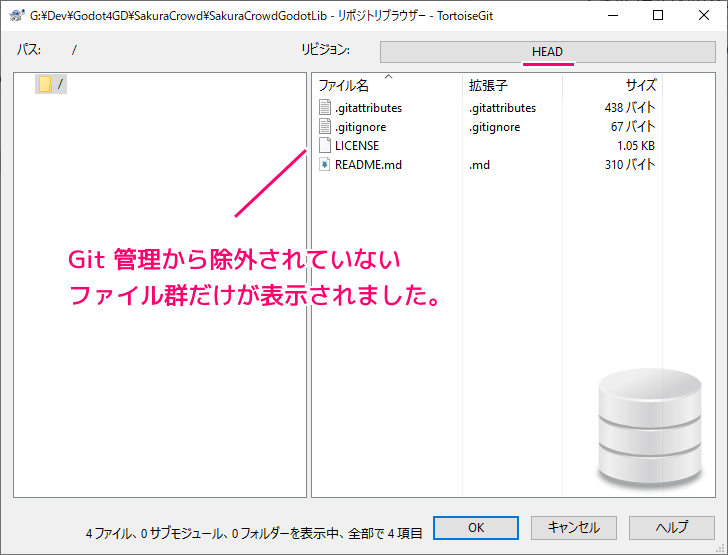
現在のコミットで Git 管理しているファイルは TortoiseGit の Repository Browser でも確認できます。
The Repository Browser
Sometimes you need to see all contents/files of a repository, without having a working tree (e.g. a bare repository) or you want to see all files of a revision without switching to it. That’s what the Repository Browser is for. You can open it using TortoiseGit → Repo-browser or from the log dialog (cf. the section called “Log Dialog”) using the context menu of a commit.
場合によっては、作業ツリー (裸のリポジトリなど) を持たずにリポジトリのすべてのコンテンツ/ファイルを表示する必要がある場合や、リビジョンに切り替えることなくリビジョンのすべてのファイルを表示したい場合があります。それがリポジトリ ブラウザの目的です。 TortoiseGit → リポブラウザを使用するか、コミットのコンテキスト メニューを使用してログ ダイアログ (「ログ ダイアログ」セクションを参照) から開くことができます。
The Repository Browser – TortoiseGit – Documentation – TortoiseGit – Windows Shell Interface to Git と Google 翻訳
作業ディレクトリをエクスプローラで開いて、右クリックで表示されるメニュー「TortoiseGit」→「リポジトリブラウザー」を選択します。

選択されているリビジョン(例では HEAD) で Git 管理されているファイル名が、先ほどの git ls-tree コマンドの結果と同じく4つ表示されました。
今回はここまで
次回に続きます。
参照サイト Thank You!
- Git
- TortoiseGit – Windows Shell Interface to Git
- A successful Git branching model » nvie.com
- Git – git-branch ドキュメント
- Git – git-rm Documentation
- Git – git-checkout Documentation
- Git – git-switch Documentation
- Git – git-log Documentation
- Git – git-restore Documentation
- Git – git-ls-tree Documentation
- Git – git-commit Documentation
- Git – git-cherry-pick Documentation
- Git – git-merge Documentation
- Git – git-tag Documentation
- Git – git-show-ref Documentation
- The Repository Browser – TortoiseGit – Documentation – TortoiseGit – Windows Shell Interface to Git
記事一覧 → Compota-Soft-Press

コメント