
無料で 3D CG やアニメーションが作成できる Blender で、カメラビューの枠内のアニメーションを mp4 ファイルに保存する手順を紹介します。
例として、移動・回転とリジッドボディによる物理演算を組み合わせたサイコロを転がすアニメーションを mp4 ファイルに保存します。
※ Blender 4.5.3 LTS を使用します。
前回の記事
前回は、アニメーションを撮影する際に用いるカメラの位置と角度を、カメラビューで確認しながら調整する手順の例を紹介しました。
参考にした公式ガイド
以下の公式ガイドを参考にして、アニメーションをレンダリングします。
Frame Sequence Workflow
- First prepare your animation.
- In the Format panel, choose the render size, Pixel Aspect Ratio, and the Range of Frames to use, as well as the frame rate, which should already be set.
- In the Output panel set up your animation to be rendered out as images, generally using a format that does not compromise any quality.
- Choose the output path and file type in the Output panel as well, for example
//render/my-anim-.- Confirm the range of your animation (frame Start and End).
- Save your blend-file.
- Press the Animation button and once the animation is finished, use your file manager to navigate to the output folder (
renderin this example). You will see lots of images that have a sequence number attached to. These are the single frames.- In Blender, open the Video Sequencer.NoteThe Video Sequencer does not support multi-layer EXR files. To render to a video format you will have to skip the next three steps and instead use an Image Input node in the Compositor.
- Choose Add Image from the add menu. Select all the frames from your output folder that you want to include in your animation. They will be added as a strip in the Sequence editor.
- Now you can edit the strip and add effects or leave it like it is. You can add other strips, like an audio strip.
- Scrub through the animation to check if you have included all the frames.
- In the Output panel, choose the container and codec you want (e.g.
MPEG H.264) and configure them. The video codecs are described in Output Options.- Click the Animation render button and Blender will render out the Sequence editor output into a movie.
Rendering Animations – Blender 4.5 LTS Manual と Google 翻訳
- まずアニメーションを準備します。
- [フォーマット] パネルで、レンダリング サイズ、ピクセル アスペクト比、使用するフレームの範囲、およびフレーム レートを選択します (これらはすでに設定されているはずです)。
- [出力] パネルで、通常は品質を損なわない形式を使用して、アニメーションが画像としてレンダリングされるように設定します。
- [出力] パネルで出力パスとファイル タイプも選択します (例: //render/my-anim-)。
- アニメーションの範囲(フレームの開始と終了)を確認します。
- ブレンドファイルを保存します。
- [アニメーション] ボタンを押し、アニメーションが終了したら、ファイル マネージャーを使用して出力フォルダー (この例ではレンダリング) に移動します。シーケンス番号が付けられた画像がたくさん表示されます。これらはシングルフレームです。
- Blender でビデオ シーケンサーを開きます。
注記
ビデオ シーケンサーはマルチレイヤー EXR ファイルをサポートしていません。ビデオ形式でレンダリングするには、次の 3 つの手順をスキップし、代わりにコンポジターのイメージ入力ノードを使用する必要があります。- 追加メニューから「画像の追加」を選択します。アニメーションに含めるすべてのフレームを出力フォルダーから選択します。これらはシーケンスエディターにストリップとして追加されます。
- これで、ストリップを編集してエフェクトを追加したり、そのままにしておくことができます。オーディオ ストリップなどの他のストリップを追加できます。
- アニメーションをスクラブして、すべてのフレームが含まれているかどうかを確認します。
- [出力] パネルで、必要なコンテナとコーデック (MPEG H.264 など) を選択し、構成します。ビデオ コーデックについては、「出力オプション」で説明されています。
- [アニメーション レンダリング] ボタンをクリックすると、Blender がシーケンス エディターの出力をムービーにレンダリングします。
レンダリングは CPU パワーを非常に多く使用するので、PC 作業をしない時間に行うか、 blender アプリのプロセスの優先順位を下げて行ってください。
Rendering takes all available CPU time; you should render overnight, when the computer is not needed, or set Blender to a low priority while rendering, and work on other things (be careful with the RAM space!).
レンダリングには利用可能な CPU 時間がすべて消費されます。コンピューターが必要ないときは夜間にレンダリングするか、レンダリング中は Blender の優先順位を低く設定し、他の作業を行う必要があります (RAM スペースに注意してください)。
Rendering Animations – Blender 4.5 LTS Manual と Google 翻訳
保存する動画の設定
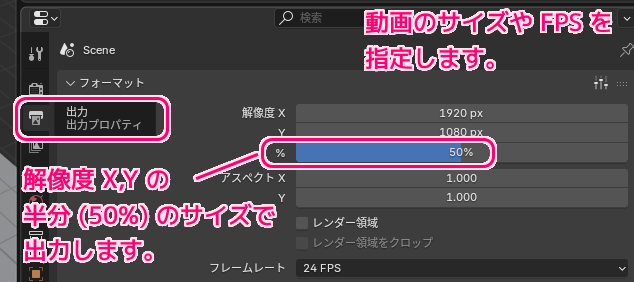
出力プロパティを選択して、開きます。
出力プロパティの一番上に配置されている、フォーマットパネルでは、解像度や FPS (1秒間のコマ数) を設定できます。
解像度はデフォルトで 1920 x 1080 px でしたが、その下のパーセントを 50 % にすることで半分の 960 x 540 px で出力できます。
Resolution X, Y
The number of pixels horizontally and vertically in the image.
画像の水平方向と垂直方向のピクセル数。
Percentage
Slider to reduce or increase the size of the rendered image relative to the Resolution values. This is useful for small test renders that have the same proportions as the final image.
スライダーを使用して、解像度の値に応じてレンダリングされた画像のサイズを増減します。これは、最終イメージと同じ比率を持つ小規模なテスト レンダーに役立ちます。
Format – Blender 4.5 LTS Manual と Google 翻訳
レンダー領域とレンダー領域クロップは、カメラビューのさらに一部をレンダリングする際の設定のようです。
Render Region
Renders just a portion of the view instead of the entire frame. See the Render Region documentation to see how to define the size of the render region.
フレーム全体ではなく、ビューの一部だけをレンダリングします。レンダー領域のサイズを定義する方法については、レンダー領域のドキュメントを参照してください。
Crop to Render Region
Crops the rendered image to the size of the render region, instead of rendering a transparent background around it.
レンダリングされたイメージの周囲に透明な背景をレンダリングするのではなく、レンダリング領域のサイズに合わせてレンダリングされたイメージをトリミングします。
Format – Blender 4.5 LTS Manual と Google 翻訳
レンダリングするフレーム範囲の設定
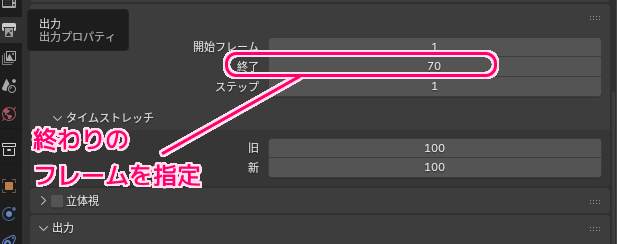
フォーマットパネルの下のフレーム範囲パネルで、レンダリングする開始フレームと終了フレームを指定できます。
今回のサイコロを転がす動画は 65 フレーム程度なので終了フレームを 70 に指定しました。
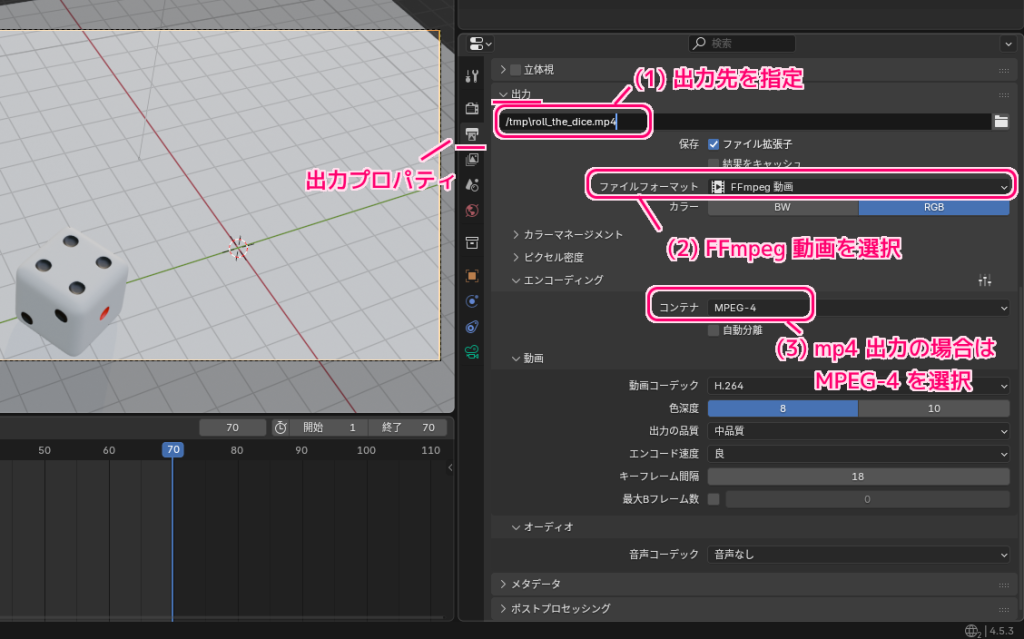
出力先、ファイル形式などの設定
出力パネルの一番上のパス入力欄に出力するファイルパスを指定します。
ファイルフォーマット項目では、動画タブの FFmpeg 動画を選択します。
動画を選択すると表示されるエンコーディングパネルでは、コンテナ項目に MPEG-4 を指定して、 mp4 形式で出力するように設定します。
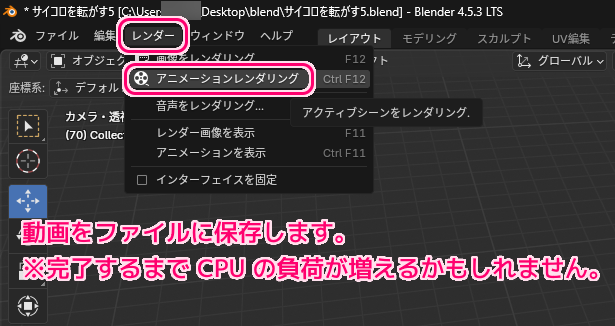
レンダリング(ファイル出力)
メニュー「レンダー」→「アニメーションレンダリング」で、動画ファイルに保存します。
※完了するまで CPU の負荷が増えるかもしれません。
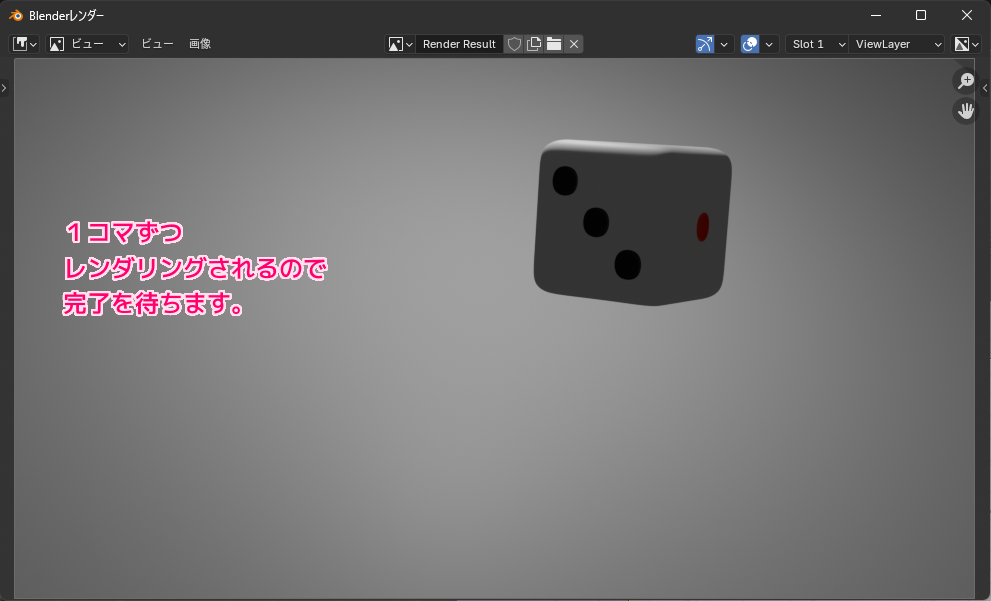
1フレームずつレンダリングしている様子を確認しながら待っていれば完了です。
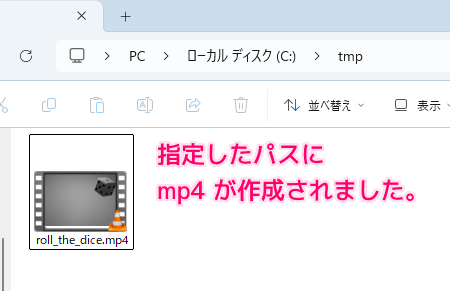
出力ファイルの確認
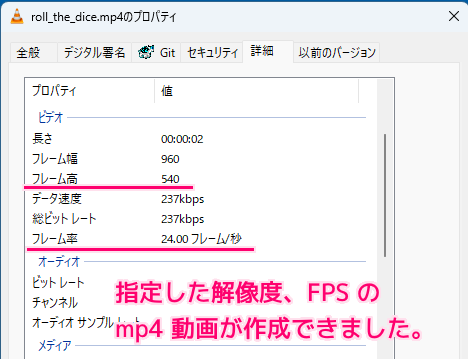
指定した出力先に mp4 形式の動画ファイルが出力されました。
プロパティの詳細タブを確認すると、指定した解像度(1920 x 1080 x 0.5 = 960 x 540) と FPS で動画が作成されています。
以下は、ファイル出力された動画です。
まとめ
- Blender のメニュー「アニメーションレンダリング」で、サイコロが転がるアニメーション・物理演算を mp4 ファイルに出力しました。
- 出力プロパティのフォーマットパネルでは、解像度、 FPS などを指定できます。
- 出力プロパティのフレーム範囲パネルでは、レンダリングする開始フレームと終了フレームなどを指定できます。
- 出力プロパティの出力パネルでは、出力先のファイルパスや、出力する形式(画像・動画)、動画の場合はコンテナで MPEG-4 などを指定できます。
参照サイト Thank You!
- Blender – The Free and Open Source 3D Creation Software — blender.org
- 3D Viewport – Blender 4.5 LTS Manual
- Camera View – Blender 4.5 LTS Manual
- Rendering Animations – Blender 4.5 LTS Manual
- Format – Blender 4.5 LTS Manual
- 【blender4.2対応】サイコロを作ろう! – YouTube
記事一覧 → Compota-Soft-Press

コメント